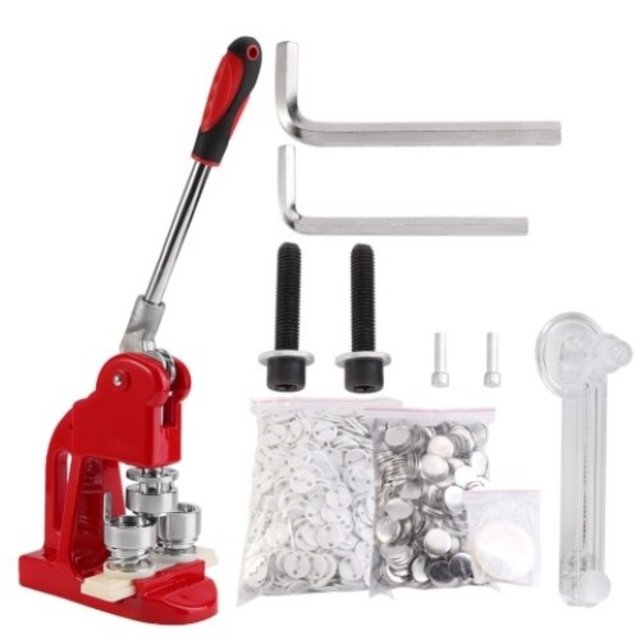
Although making buttons may not be for all, it's an enjoyable craft that can be enjoyed by everyone. It's a simple and straightforward devices that can be used by anyone, even your young children, with a little direction from your parents. You can make presents for your friends and family members, making namesakes for birthday celebrations, for the purpose of bringing your favorite characters back to life, or to decorate your tote bags with your favorite quotes these button makers can be used to do numerous enjoyable things! Using the Button Maker Step-by-Step MethodThe method of creating the button button maker typically differs depending on the model but the process is the same. Most of these devices are manual and easy to operate, and don't require electricity or even batteries. The machines are operated with your own physical strength. It's not that difficult. Here are the steps you should take to use a button-maker. Installation of the Button Maker Most button makers are assembled inside the packaging. This is particularly true when the device you're using and handheld. If the maker you have chosen is one that is rather large it is possible that you will need to assemble and install it yourself. For most of these machines, assembling means a simple process of screwing the machine into the base. You can make use of your hands for this normally in the first stage , then using the screwdriver supplied with the machine. The second procedure is to connect dies onto the button maker machine, usually one on the bottom and another at the top. In some cases, the bottom of the machine includes two dies rather than one, but they do come together in a set. These button makers have two dies at their bottom. They are used to create pin-back buttons, and rope tie-ups. Next comes installing the lever to the top of the machine, which also needs the help of an screwdriver. That's all you need to prepare your button maker to start working. Collecting the Button Parts The majority of button makers come with all the parts for buttons are required to make buttons. There could include a set of 100 button accessories or 1000 buttons, but generally, all of the components are put together. There are generally three components to an item: a metallic piece, a transparent myler piece, and pin back. These can be circular or come in a particular size to make them suitable for the machine. Printing the design It is necessary to print the design you prefer to make a button badge or bottle opener or the keychain. You can make use of a standard printer and regular papers to complete the task. You can make use of photo-editing software or download a logo or a text from the Internet to design your logo. The printer can be used to print your desired number of buttons however many times you need. The design can be cut out Print the design in the exact size of your button pin back, and then cut it out to the same size. Cut your design with a pair of ordinary scissors or scissors if you create the circle around the image. It's faster when you use a rotary cutter to do the job, and more precise too. If you own a button making business and you need to make many buttons within a short amount of time it is best to purchase a rotary cutter that will automatically cut the pieces in less time than you can with your hands. Making different kinds of Buttons The next step is making your buttons with your button maker. Insert the metal into one of the dies at the bottom (your instruction manual will tell you which die to choose). The paper that has been printed is next and the design is facing upwardsand its back to the metal plate. Next to the design is the myler, or the transparent plastic piece of film. All the pieces need to be perfectly aligned. Put the pin-back part of the metal of the button inside the bottom die on the other side close to the one in which you have inserted your design. It is necessary to place the accessories' backs such as keychainsand bottle openers and so on. on the second die. The pin-back should be directed downwards, and so does the bottle opener part. After the components have been assembled, you will need to pull the lever using great strength. Be sure to make this pull on the first die, the one that contains all three buttons. The top die will slide down and press against the lower die. When you release the lever, all three components will have come together and disappeared into the die above. The design would then be placed into the bottom die. If the components are in place, that means that you did not apply sufficient force to the lever. You'll need to start over. Finish the batch The procedure is the same regardless of whether you're making the pin-back pin button as a basic pin-back, an inverse-back button, key chain, or a bottle opener. It's only the back part of the button that has to change but not the initial three components. The same design can be used to make batches of any kind of button using the same equipment. The most robust button maker can be made as much as 200 to 300 pieces in under an hour, which is quite helpful if you run your own business. The first few ones might be slower, but once you become accustomed, it will take anyone less than a couple of seconds to press an action. A button-making machine can be described as a basic machine that is accessible to anyone. Since these machines are quite simple to use and understand and use, it is possible to operate them without any expertise or technical skills.
0 Comments
Leave a Reply. |
 RSS Feed
